:max_bytes(150000):strip_icc()/olivia-kanaley-inman-author-0421-d4c0a38b22c244aea70778bb9d13a184.jpg)
:max_bytes(150000):strip_icc()/wrapping-paper-gift-bag-0821-2000-949f781d3531417cb4e8de97f656f0ac.jpg)
A little scoring, folding, and gluing will transform your favorite patterned gift wrap into a custom gift bag (butcher paper or non-adhesive wallpaper would work beautifully, too). Added details like coordinating ribbon (a great use for shorter scraps) and metal eyelets create a polished, finished look.
What You'll Need
Materials
- Paper Gift Bag template
- Gift-wrapping paper (Rifle Paper Co. Emerald Peonies Wrapping Sheet)
- Ruler
- Bone folder (Fiskars Traditional Bone Folder)
- Craft scissors
- PVA glue (Books by Hand pH Neutral PVA Adhesive)
- Metal eyelets (We R Memory Keepers Standard Eyelets)
- Eyelet setter and anvil (Darice Eyelet Setter Set)
- Ribbon (DIN Fashion Supplies Cotton Twill Tape Ribbon, 1", $5 for 4 yds.)
Instructions
-
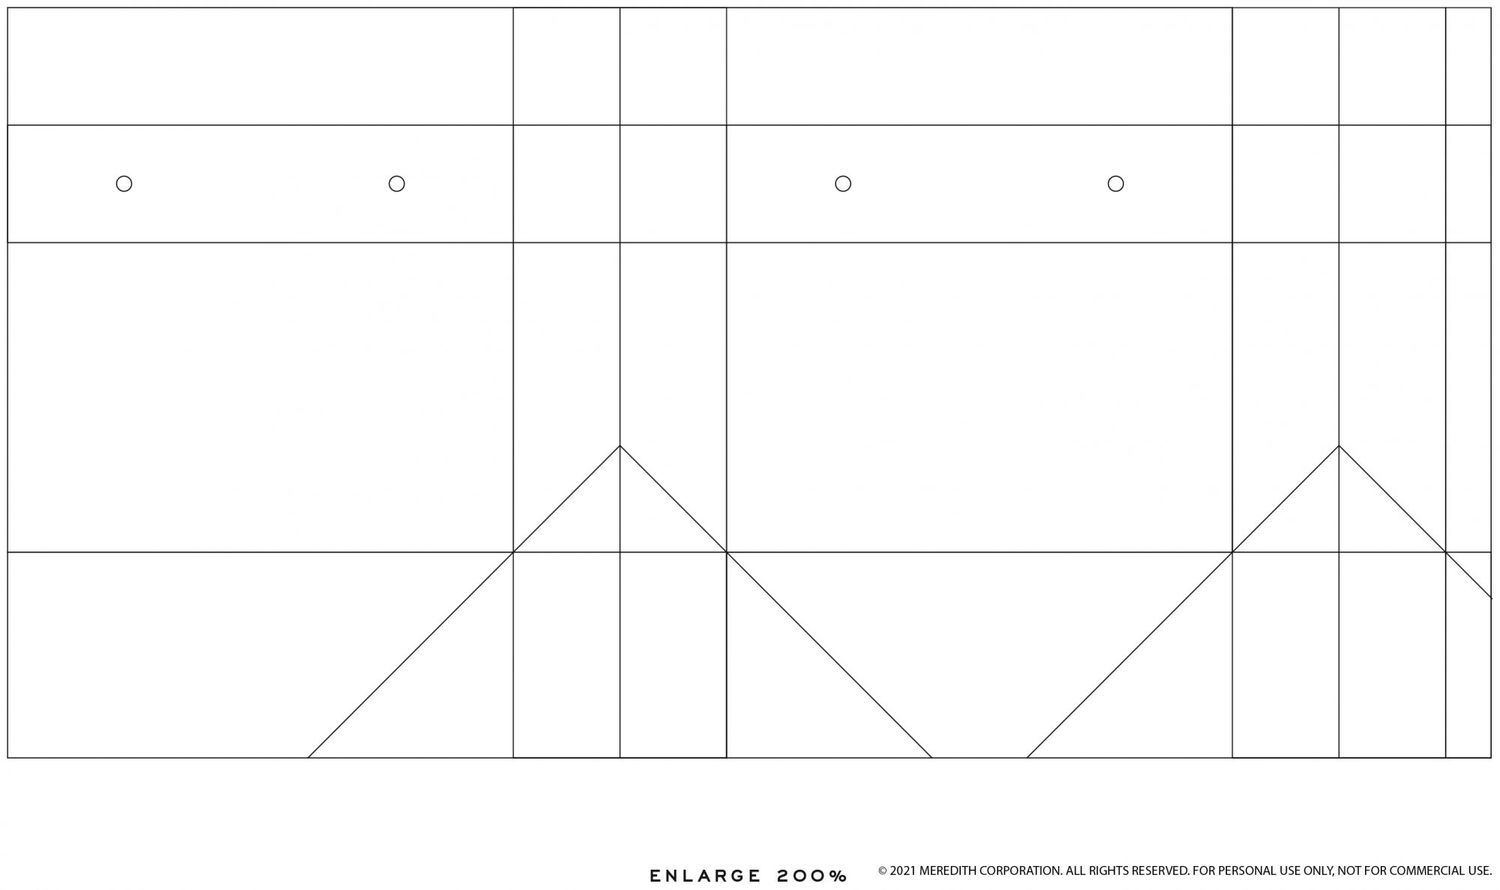
![wrapping paper gift bag template]()
Olivia Kanaley Inman Cut a rectangle from wrapping paper that measures 19 by 9.6 inches. Download and print the template; use as a guide to score and fold along the lines, as shown.
-
![wrapping paper gift bag step 2]()
Olivia Kanaley Inman Fold along the horizontal lines at the top and bottom, using bone folder to produce crisp creases.
-
![wrapping paper gift bag step]()
Olivia Kanaley Inman Using the template as a guide for placement, create 4 small holes along the top folded edge of the bag. Insert and set metal eyelets; each eyelet should go through two layers of paper. (Tip: Alternatively, you can use a hole punch.)
-
![wrapping paper gift bag step 3]()
Olivia Kanaley Inman Apply glue along the thin, folded tab on the end to close the corner of the bag. Fold in the flaps at the bottom of the bag and secure the outermost flat with a dab of glue.
-
![wrapping paper gift bage step 5]()
Olivia Kanaley Inman Cut a length of ribbon and thread each end through eyelets, knotting inside the bag. Repeat for the opposite side.
:max_bytes(150000):strip_icc()/wrapping-paper-gift-bag-template-alt-0821-2000-6921df9385b142ccb7e9603dbc458db5.jpg)
:max_bytes(150000):strip_icc()/wapping-paper-gift-bag-step-2-0821-2000-f928b817013d4624b2cc48f3b50f3ebe.jpg)
:max_bytes(150000):strip_icc()/wrapping-paper-gift-bag-step-0821-2000-cfa1d31c70154b559fc532be6cf4ab43.jpg)
:max_bytes(150000):strip_icc()/wrapping-paper-gift-bag-step-3-0821-2000-28715e5196034678b22898be94150975.jpg)
:max_bytes(150000):strip_icc()/wrapping-paper-gift-bag-step-5-0821-2000-f9a77ec073c345068dfa6d684ed33893.jpg)
:max_bytes(150000):strip_icc()/martha-handmade-heart-boxes-0c8482a5-0120-2000-c1cd6d71ad824245a703d88077846352.jpg)
:max_bytes(150000):strip_icc()/mla101446_0406_tulipstable_vert-a32b2b7e4712490890a4ab19df93baca.jpg)
:max_bytes(150000):strip_icc()/folded-paper-hearts-0218-2000-e1575912630733-96b6cc073d4c4c1e926b12733bd7bfba.jpg)
:max_bytes(150000):strip_icc()/mld106532_1210_bucket3_vert-63ada0e062b04d78bd87e0ac316138fc.jpg)
:max_bytes(150000):strip_icc()/pc_wgd104781_cathouse3a_hd_0-d023db4a952348a19bb0e0bb9d09cab6.jpg)
:max_bytes(150000):strip_icc()/dresden-christmas-cards-7a91a256-1220-8b2979e25b114721a52c096365ec397d.jpg)
:max_bytes(150000):strip_icc()/petit-collage-animal-masks-0515_vert-ff90e40eabb94e2bbdad4535e823564c.jpg)
:max_bytes(150000):strip_icc()/shake-on-it-hand-goody-bag-1B0TGFtf4s28Zkqd0GrIxu-silo-1021-2000-55af794b7a014e30905d13dab346f7c7.jpg)
:max_bytes(150000):strip_icc()/mld105339_0410_pplants2_050_sq-0919-onecms-0f482ca82dd543a18ce3be52cb538d63.jpg)
:max_bytes(150000):strip_icc()/bootiful-party-invitations-materials-1017-onecms-72c5588611794dfc9e620ae3a0fb3866.jpg)
:max_bytes(150000):strip_icc()/md105845p_1210_resents_001_vert-f78aec48eb4e441f8cdc90fcdb8012c6.jpg)
:max_bytes(150000):strip_icc()/person-wearing-multiple-braided-leather-bracelets-CEMPMQ0CaOyB2xeE1ZY8N9-0621-7198957baf9a4a138eb6c0bd8e159cb5.jpg)
:max_bytes(150000):strip_icc()/oversized-ribbon-candy-ornament-1215-d111141-56d79ccf604f4a61a7c5cfabc4902f4e.jpg)
:max_bytes(150000):strip_icc()/red-green-star-stockings-Dn5J3udtKtS8suWuEtOvAL-1221-4286137e399a44fd87f1b08049cf4188.jpg)
:max_bytes(150000):strip_icc()/ribbon-scrapbook-d104226-1019-5ec71fbaa23748e7ac4df3d8334b42bb.jpg)
:max_bytes(150000):strip_icc()/beauty-beast-baby-shower-tea-party-favors-3-0317_vert-381fa40c46224b678ae7ccad1e418fe8.jpg)